My husband and I recently drove from Utah
to Texas to visit family. On our way
we stopped at any thrift or antique
store we found.
We hit Albequergue, NM midmorning
on our second day of driving.
A quick search found lots of places to stop.
Our first stop was the
We were about to drive away when ...
The Burning Daylight Coffee Co. owner
came out and told us they'd be there soon!
You see they all share the same building!
Boy am I glad we waited!
BECAUSE....
I found this little lady in a case of other dolls!
She is a blonde Miss Revlon wearing
her original yellow stripe dress.
Her dress is rumpled but no apparent
damage or stains!
Her hair is quite messy.
She is dirty and has some goop on her eyelid.
Besides her dress she was wearing pink
undies and slip. She also had her stockings.
When we got back home she got a spa day.
Shampoo and conditioner.
Better!
I brushed out her hair and rolled it up.
She will stay in rollers for a couple days.
While her hair is drying I repinked her cheeks.
She did have her stockings, but they
had holes.
I inserted a wooden kitchen tool into the
stockings and went around all holes with
"Fray Check". When they are dry
I will stitch them by hand.
Here is her washed dress before ironing.
Here is how to iron a gathered skirt:
Time to take the curlers out!
Nice curls, but I wish they were tighter...
I pulled her hair back on the sides and
bobby pinned it.
I played around with it quite a bit,
(I wish my friend Janet was here!)
I finally got her hair to look right,
BUT,
She needs something more for her hair...
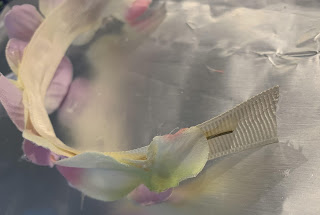
I started a bandeau hat. It's just gros-grain
ribbon with a wire hot-glued to it.
Then I add petals and flowers.
I tried to keep it in the off white range so it
wouldn't overwhelm her yellow dress.
And here it is!
Well, she's all cleaned and coiffed...
HERE
SHE
IS!
(her dress was nicley pressed,
then I played with her)
Still very pretty!
(her left sleeve is still a little grey, so
it may get a second wash)
I'm very happy with this little lady!
Oh, and here are her shoes. I made these years
ago for my Cissy.
AND
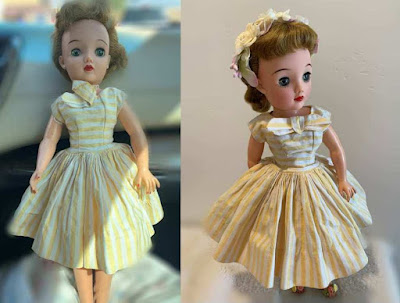
Some Before and After photos.
First photo right after I got her!
And
after she is all beautiful again.
Before and After
Welcome Home Laura Ann!
Side by side
Guess who is getting a hair
makeover next?
NOTE: Comment as Anonymous, just sign your name!!
Hope to hear from you!


.jpg)
.jpg)
.jpg)
.jpg)
.jpg)
.jpg)
.jpg)
.jpg)
.jpg)


.jpg)
.jpg)
.jpg)


.jpg)

.jpg)

.jpg)
.jpg)
.jpg)
.jpg)
.jpg)
.jpg)
.jpg)
.jpg)
.jpg)
.jpg)
.jpg)
.jpg)
.jpg)
.jpg)
.jpg)
.jpg)


.jpg)
.jpg)
.jpg)


.jpg)