
I have taken a LOT of doll photos over the past several years.
I admit to being an amateur when it comes to photography.
But, I have learned a lot from my mistakes.
I have also learned some simple tricks!
I want to share what I have learned.
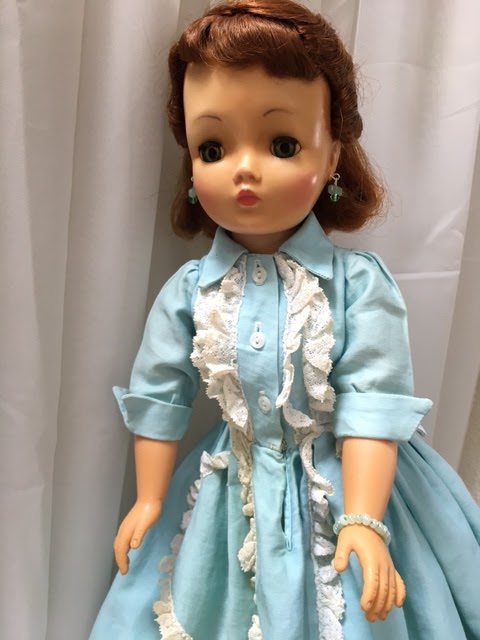
Who is this sad, depressed looking doll?
This is one of my first photos of my
Madame Alexander Cissy doll.
She looks like she just put a toddler to bed.

Here is my latest photo of Cissy from my Easter Post.
So what happened between the first photo and the second?
WELL! That is what I am sharing with you today.
ALL my photos are taken with the camera on my phone
and edited on my computer with a basic photo editor
I'll be talking about:
BACKGROUND
EDITING
POSING
and
LIGHT
Let's start with
BACKGROUND

Here is a perfect example of my early photos.
Cissy is beautifully dressed, but sadly
the extra set of legs and the horse head,
in the back, are distracting.
(feel free to laugh - I do)
I did what a lot of us busy ladies do,
I just propped my doll up and took a picture.
Here is an easy idea to make your photos better!
BACKGROUND
NOTE: click on my photos to see them close-up!

Here is a very common doll background,
The SEWING MACHINE!

SO, what I do is grab a piece of fabric
or in this case a pillow cover.

Here is my Patsyette in front of my sewing machine.
So simple and a much better photo.
BUT! WHAT ABOUT LARGER DOLLS!?!

Here is my Patsy Ann in front of a dresser.
OK, but not great.
So what do I do?

I just tucked this table cloth into a drawer.
You want some of your fabric to cover the floor
to create a seamless backdrop.

Much better!
Definitely an improvement.

After I saved this photo to my computer,
I double click on the photo to edit.
THEN I used the 'vignette' slider to create soft edges.
Move the button left for light framing
and right for dark framing.

Here is my final photo.
WAIT!
What am I talking about?
Our next step:
EDITING

This is another popular place to photograph dolls.
Yes, on the computer desk.
ALL the bric-a-brac in the background
is distracting to say the least!

Here is the same shot but I draped a scarf
behind Nina. Better! Right?
But I can still see some of my desk there on the right.

After saving my photo to my computer,
I double-clicked on my photo and
my computer editing program comes up.
All Microsoft computers have this built in photo editor!
At the top right is the EDIT button - click it.

I select CROP and move the white corner
buttons, with my mouse, until it looks right.

Don't be afraid to crop in close!
This program also has lightening and
darkening. You already saw the 'vignette' slider.

This is a filter called "Icarus".
Yes this program has filters!
Play around with some photos you saved as a copy
or photos you don't care about.
It is So much fun!
Next we will talk about
POSING.

This is another early photo of mine.
Patsy Joan is lovely, but looks grumpy.

Here is a more recent photo of Joan.
Another trick to remember
about photographing dolls is...
THE HEAD TILT!

No one takes a good photo looking straight into the camera.
Notice in the second photo, Joan is tilting her
head slightly and looking off to her right.

Here is my Cissy again.
In the first photo (your left) her chin is up.
On the right she is looking slightly down,
which makes her appearance softer.

Here is my Charlotte, she has a slight chin tilt
and her body is turned away.

Here is my Little Miss Revlon, Julia.
Her head is turned toward her shoulder
and tilted down slightly.
Turning your doll from looking directly
front, gives them a livelier appearance.
Next, LETS TALK ABOUT LIGHT

Here is Cissy again. I bet you can already see
some of my mistakes.
She is looking up, at I don't know what,
and the lighting has her face in shadows!
SAME DAY, I took her out to my entryway.

Here she is in shady, natural light.
She is looking over her shoulder and
turned until her face is in the best light.
Natural shaded light is the best!

The shadows are lessened and there is
no harsh shine
I hope you find these hints helpful!
Just remember:
BACKGROUND
EDITING
POSING
and
LIGHT!
Most importantly, have fun!


