THE PROJECT:
In my previous post you might have
noticed how cramped Betsy and Lissy
were in that tiny bed!
Even though they had fun falling asleep reading
their favorite book, it was not a situation
for future comfort!
The solution is this kitchen rack from a thrift store.
After a coat of paint I started remaking the
arch into something less kitchen-y.
I tried several different flowers and decorations.
I decided to use these felt flowers.
A little pink paint made them more interesting.
While the flowers were drying
I made some mattresses.
I decided on these fabrics for the bedding.
I hot-glued my felt flowers onto the
bunkbed back.
WANT TO SEE IT NOW?
HERE
IT
IS!!
I think the fabrics and flowers
all worked out well!
Outside edges are wrapped with this
floral accent wire.
Hi Teddy!
Here is the girl's whole room.
Lissy is very happy with her new
bunkbed to share with Betsy.
THE PLAN:
NEXT I am planning a fun future winter
post for my Little Miss Revlon dolls,
(and some other skating dolls)
But, they needed some ice skates.
The following is a tutorial showing
how I made some small doll skates.
DIY ICE SKATES.
Here is the finished skate.
HOW DID I MAKE IT?
I started with this sock that was missing it's mate.
I cut off 2 pieces from the top of the sock.
Turn pieces inside out and sew to fit doll's foot.
Be sure to sew in and out so extra fabric
can be trimmed off.
Trim off excess fabric and...
Turn right side out. Set aside.
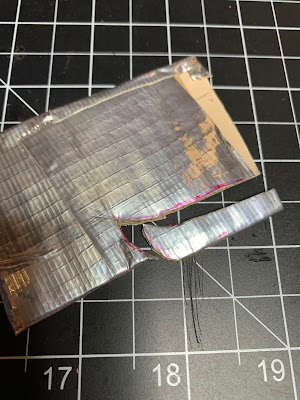
Next I used a piece of thick cardboard and
covered it in silver duct tape.
A second long skinny piece of cardboard
I rolled up and covered in tape to create a heel.
I trimmed the heel at an angle before
hot-gluing to the sock/boot.
Last, I cut out a blade shape and
hot glued that to the heel and toe.
Other ice skate blade ideas:
A large paperclip...
Or silver wire or pipe cleaner are
both great alternative skate blades.
VOILA! A simple ice skate.
Coming up in another few days
our winter ice skating event!
Here is a sneak peek!
Stay tuned!


13 comments:
Brenda, I absolutely LOVE your repurposed bunk beds!!
Happy Holidays,
Jenny :-)
Hi Brenda,
I love your ideas. The bunkbed looks wonderful. I would never have thought of that idea.
I am looking forward to the skating post. The skates look fantastic.
Anna
Thank you Jenny,
I have made several of these bunk beds out of rattan bath shelves, but they have become hard to find. I think this one turned out better than I hoped.
Hugs
Brenda
Hi Anna,
I am happy with how the bunk beds came out. I wasn’t sure how I could make it pretty, so it’s been sitting in my sewing room for a bit. I’m so excited to share my skating post! I’m glad you like the skates I made. I kind of wish I’d made wire skate blades, but what I did is ok. I don’t think I’ll change them now.
Hugs
Brenda
Hello Brenda,
Wow, another great thrift store find and with your magic touches, a perfect transformation. Love how you transformed the arch detail. Your fabric choices are so nice.
Can't wait to see your skating pictures. Can imagine making those tiny skates was a challenge.
Doreen in Arkansas
Hi Doreen,
I am happy with how this bunk bed came out. I was not sure I could make it more attractive. I had painted it weeks ago and kept looking at it wondering, “what am I going to do?” Finally it came to me, that I should paint parts of the leaves and cover the rest with flowers!
I cant wait to share all my skating and snow outfits. I am hoping to have them all ready in a week or so.
Hugs
Brenda
Thank you Linda,
I am so happy with my bunk bed project. It all came together very well. All the fabric, flower and wall colors really came out great.
I am looking forward to sharing my ice skating post!
Hugs
Brenda
Hi Brenda,
You have the best eye for transforming ordinary objects into doll items.
the bunk beds are terrific - i love the bird fabric used o the mattresses - it wouldn't work in my room - we are green oriented! but i sure do think it is sweet, especially with the pin stripe..
You've decorated it so splendidly - I love it!
Janet
Hi Janet,
Thank you! I have a something in my head where I see things in different ways. I don’t know what it is, but I have fun with it. I love this bird fabric. It is one of those fabric purchases that you have no idea how you’ll ever use it but you buy it cause it’s so cute! Haha. I am happy with how well it worked for the girls bunks. I am happy with the results!
Hugs
Brenda
I love all your DIY craft projects for the dolls! The beds are simply divine. Love your new Lissy and her outfits, too!
Thank you Karen,
I am so glad you like what I’ve done. Lissy is adorable and such a fun size. I have enjoyed creating clothes and the bunk bed for her.
Hugs
Brenda
What a fabulous transformation! I love the flowers and your fabric choices for the bedding - this is a beautiful girls' room.
Your ice skates tutorial is so nicely done - how clever to make use of that unpaired sock in such a fun way!
Susan J in IL
Thank you Susan,
I love making things into something else. I have made several rattan racks into bunk beds like this for smaller dolls. The ice skates came out better than i had hoped. They worked great for my skating post.
Hugs
Brenda
Post a Comment